Montag, 18. Mai 2015

Injecting a non-native data type via constructor using a Unity XML configuration

I thought it could be helpful to write a few lines about the following problem as I couldn't find any blog, technet or stackoverflow article providing a clear and easy-to-follow solution.

In one of my projects, I have a class that receives a data repository via a constructor injection. For a better illustration, find a simplified version of the class, the repository interface and implementation below.

namespace UnityTest
{
    public interface IRepository
    {
        object GetEntry(int id);
    }
}
using System;

namespace UnityTest
{
    public class Repository : IRepository
    {
        public object GetEntry(int id)
        {
            throw new NotImplementedException();
        }
    }
}
namespace UnityTest
{
    public class MyClass
    {
        IRepository repository;

        public MyClass(IRepository repository)
        {
            this.repository = repository;
        }

        public void DoSomeThing()
        {
            this.repository.GetEntry(0);
        }
    }
}

Pretty straight forward implementation as you can see. Injecting the actual type of the IRepository interface is now quite easy when using a programmatically approach to configure the unity container (add a reference to Unity via NuGet if not done yet).

IUnityContainer container = new UnityContainer();
container.LoadConfiguration();
var myClass = container.Resolve<MyClass>();
myClass.DoSomeThing();

While that works fine, I thought it could be a good idea to extract the container configuration into an XML file as I won't have to recompile the application to change the interface binding. And that is where the tricky part comes in. Actually I thought it couldn't be a big deal to put that into an XML file but it turned out that this is not that obvious as you might think  - and as described before, there aren't that many resources out there in the net that describe this in a simple way.

So this is the simplest solution that I came up with to inject the IRepository implementation via a constructor using an XML based Unity configuration:
<configuration>
 
  <configsections>
    <section name="unity" type="Microsoft.Practices.Unity.Configuration.UnityConfigurationSection, Microsoft.Practices.Unity.Configuration" />
  </configsections>
 
  <unity xmlns="http://schemas.microsoft.com/practices/2010/unity">
 
    <alias alias="IRepository" type="UnityTest.IRepository, UnityTest" />
    <alias alias="Repository" type="UnityTest.Repository, UnityTest" />
 
    <container>
      <register mapto="Repository" type="IRepository" />   
     
      <register name="MyClass" type="UnityTest.MyClass, UnityTest">
        <constructor>
          <param name="repository" type="IRepository">
            <dependency name="IRepository" />
          </param>
        </constructor>
      </register>
     
    </container>
   
  </unity>
 
</configuration>

Hope that helps someone (at least it does help myself, should I run into that again in the future).

Dienstag, 5. Mai 2015

Deploying an UI app on a Windows 10 IoT based Raspberry 2

So Microsoft finally released the Windows 10 image for the Raspberry 2, also referred to as "Windows 10 IoT Core Insider Preview image" (*phew*). That was last Thursday, during the Build 2015.


On the week-end I had a first look on the image and how to set it up on my Raspberry. After installing Windows 10 on my desktop machine it appeared that the card reader that I'd borrowed from a friend didn't work at all along with Windows 10. Awesome. Quite a short experiment.

Today my shiny new USB card reader arrived (thank you Amazon Prime!) so I managed to install the image on the 32 GB micro SD card. No obstacles so far, plugged it back to the Raspberry and booted up the device. After some initialization process the system arrived at the default screen for the Windows IoT Raspberry edition.


So what to do now? :-)

The samples that Microsoft provides on the IoT website are a good starting point for playing around with the device and the new operating system. So I chose the "Hello world" sample for a first try, a classic!

Before proceeding, I had to download the latest release candidate of Visual Studio 2015 (it doesn't matter whether Community or Professional edition as both have the same features) as it's required to build and deploy applications on the Raspberry.

While Visual Studio was being installed (on a Windows 10 or 8.1 machine, shouldn't make a difference from here on anymore), I had a look on the basic configuration of the Windows installation on the Raspberry using PowerShell.

This can be done by opening a PowerShell console with Administrator privileges. By issuing the following commands, a remote session with the Raspberry will be established (minwinpc is the default name of the Raspberry by the way):
net start WinRM
Set-Item WSMan:\localhost\Client\TrustedHosts -Value minwinpc
Enter-PsSession -ComputerName minwinpc -Credential minwinpc\Administrator 
The last command took about 30 seconds to return, so don't get nervous. The following command will change the computer name and reset the password, so I adapted the values to something more meaningful.
setcomputername <new-name>
net user Administrator [new password] where [new password]
schtasks /Delete /TN Microsoft\Windows\IoT\Startup /F


Finally, the device can be restarted using the well-known shutdown command:
shutdown /r /t 0


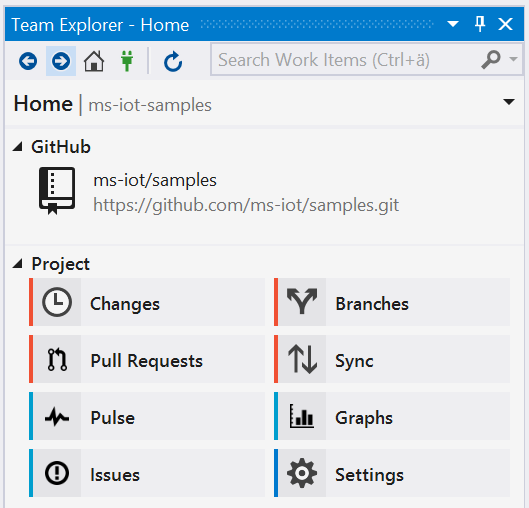
In the meantime, the Visual Studio installation had finished. As the new version comes with an updated Git client, I decided to give it a try and cloned the sample project on GitHub directly from within the IDE:


To check whether the Raspberry is up again and accepted my new configuration, I opened a web browser to access its web interface. This provides a lot more additional information and other neat features (deployment stuff, processes overview, performance monitor, etc.). The web interface is accessible via http://<device_name>/, in my case it was http://raspwin/.


As the configuration change was obviously accepted, I proceeded to the HelloWorld sample project. Opening it from the cloned Git repository will show that it's actually an Universal app, that new project type that is intended for the deployment on nearly any kind of device (classic x86/x64 desktop/notebooks, Windows Phones, ARM based devices, etc.).

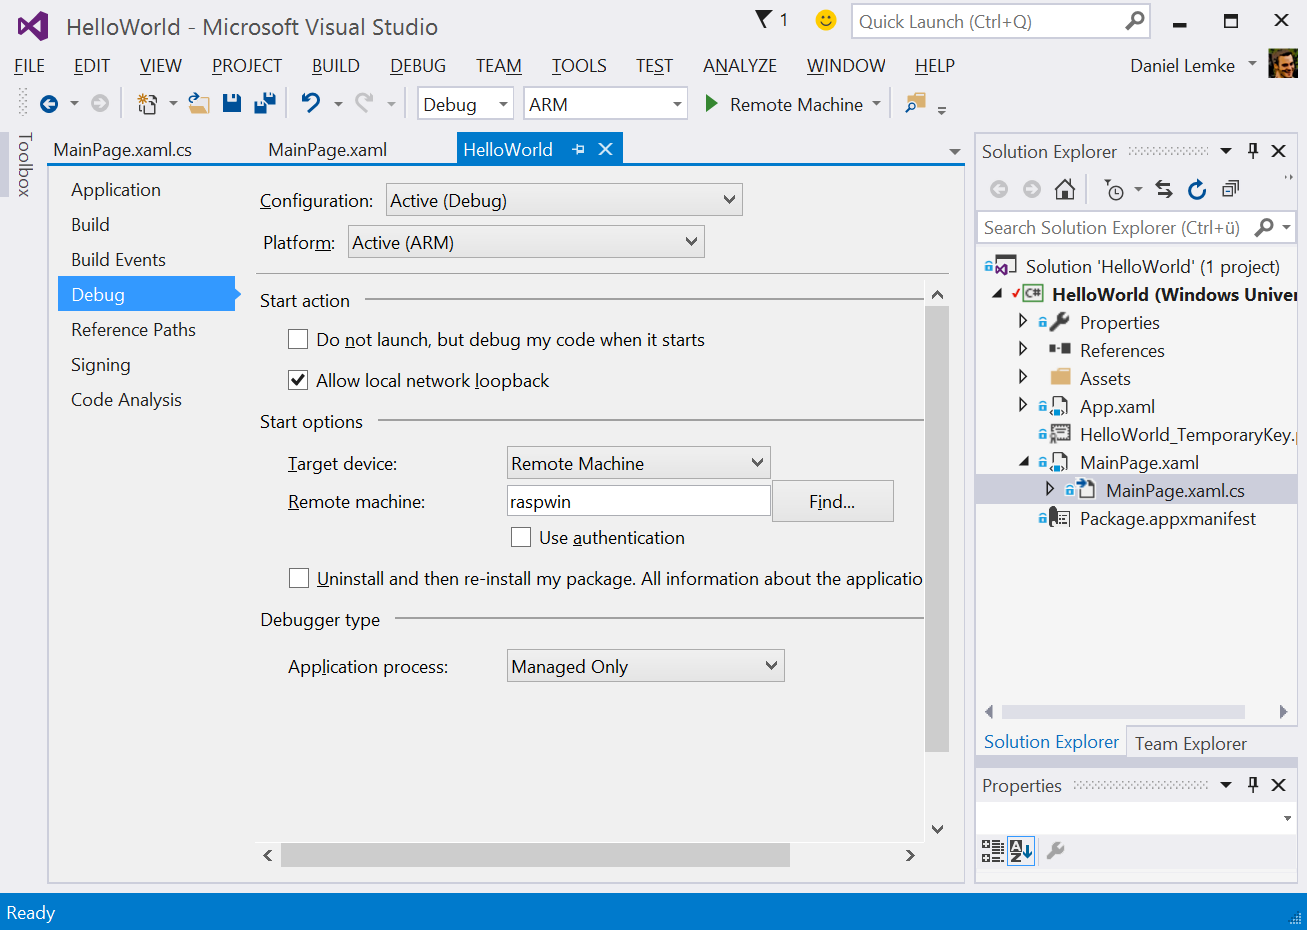
For the deployment on the Raspberry, the platform has to be changed to ARM. This can be done in the project options under Debug as shown below. This is also the right place to define the target device, which has to be set to "Remote Machine" along with the actual device name. The "Use authentication" checkbox must be unchecked.


And that's it, pressing F5 should now build and deploy the application. My TV screen switched for a moment to some kind of boot up logo before then showing the actual application.

In case that Visual Studio aborts the deployment with an error message “Unable to connect to the Microsoft Visual Studio Remote Debugger ...", you'll have either to restart the device or connect via PowerShell as described before to run the following command.
schtasks /run /tn StartMsvsmon 

Afterwards you should see two instances of the process "MSVSMON.EXE" (check via web interface or command "tlist" on PowerShell).

There we go! :)


And even the live debugging works :)


As a conclusion I would say that this was pretty easy to set up and even the remote deployment was completely painless. For a very first version of the system, not a bad start!

PS: Even no blue screen so far! ;-)