Mittwoch, 10. Juni 2015

Install Windows 10 IoT Core Insider Preview image using Windows 8.1

This article will briefly describe how to install the Windows 10 IoT Core Insider Preview image for the Raspberry Pi 2 on a SD card using Windows 8.1 (Windows Vista/7/8 should however work as well). This way you won't need to install a full Windows 10 on a physical machine as described in the official Microsoft "Get Started" article.


The procedure is basically the same as in the article, the only notable difference is that we will have to get a copy of the latest version of the "Deployment Image Servicing and Management" (DISM.exe) tool which is shipped together with Windows 10.

If you don't have a Windows 10 installation available, you can follow these instructions to get the tool:

  • Download the "Windows Assessment and Deployment Kit (ADK) RC for Windows 10:
    http://go.microsoft.com/fwlink/p/?LinkId=526740
  • Run the setup wizard and ensure to select the "Windows Software Development Kit" when the setup prompts for the installation features.

You should now find the dism.exe with version number 10.0.*, by default at the following location:
C:\Program Files (x86)\Windows Kits\10\Assessment and Deployment Kit\Deployment Tools\amd64\DISM\dism.exe 


That's it, you can now follow the installation instructions in the Microsoft "Get Started" article. Just make sure that you use the updated dism.exe at step 10, so usually you want to issue the following command:
"C:\Program Files (x86)\Windows Kits\10\Assessment and Deployment Kit\Deployment Tools\amd64\DISM\dism.exe" /Apply-Image /ImageFile:flash.ffu /ApplyDrive:\\.\PhysicalDriveN /SkipPlatformCheck 

If this was successful, you should now see the image being written to the SD card.


Montag, 18. Mai 2015

Injecting a non-native data type via constructor using a Unity XML configuration

I thought it could be helpful to write a few lines about the following problem as I couldn't find any blog, technet or stackoverflow article providing a clear and easy-to-follow solution.

In one of my projects, I have a class that receives a data repository via a constructor injection. For a better illustration, find a simplified version of the class, the repository interface and implementation below.

namespace UnityTest
{
    public interface IRepository
    {
        object GetEntry(int id);
    }
}
using System;

namespace UnityTest
{
    public class Repository : IRepository
    {
        public object GetEntry(int id)
        {
            throw new NotImplementedException();
        }
    }
}
namespace UnityTest
{
    public class MyClass
    {
        IRepository repository;

        public MyClass(IRepository repository)
        {
            this.repository = repository;
        }

        public void DoSomeThing()
        {
            this.repository.GetEntry(0);
        }
    }
}

Pretty straight forward implementation as you can see. Injecting the actual type of the IRepository interface is now quite easy when using a programmatically approach to configure the unity container (add a reference to Unity via NuGet if not done yet).

IUnityContainer container = new UnityContainer();
container.LoadConfiguration();
var myClass = container.Resolve<MyClass>();
myClass.DoSomeThing();

While that works fine, I thought it could be a good idea to extract the container configuration into an XML file as I won't have to recompile the application to change the interface binding. And that is where the tricky part comes in. Actually I thought it couldn't be a big deal to put that into an XML file but it turned out that this is not that obvious as you might think  - and as described before, there aren't that many resources out there in the net that describe this in a simple way.

So this is the simplest solution that I came up with to inject the IRepository implementation via a constructor using an XML based Unity configuration:
<configuration>
 
  <configsections>
    <section name="unity" type="Microsoft.Practices.Unity.Configuration.UnityConfigurationSection, Microsoft.Practices.Unity.Configuration" />
  </configsections>
 
  <unity xmlns="http://schemas.microsoft.com/practices/2010/unity">
 
    <alias alias="IRepository" type="UnityTest.IRepository, UnityTest" />
    <alias alias="Repository" type="UnityTest.Repository, UnityTest" />
 
    <container>
      <register mapto="Repository" type="IRepository" />   
     
      <register name="MyClass" type="UnityTest.MyClass, UnityTest">
        <constructor>
          <param name="repository" type="IRepository">
            <dependency name="IRepository" />
          </param>
        </constructor>
      </register>
     
    </container>
   
  </unity>
 
</configuration>

Hope that helps someone (at least it does help myself, should I run into that again in the future).

Dienstag, 5. Mai 2015

Deploying an UI app on a Windows 10 IoT based Raspberry 2

So Microsoft finally released the Windows 10 image for the Raspberry 2, also referred to as "Windows 10 IoT Core Insider Preview image" (*phew*). That was last Thursday, during the Build 2015.


On the week-end I had a first look on the image and how to set it up on my Raspberry. After installing Windows 10 on my desktop machine it appeared that the card reader that I'd borrowed from a friend didn't work at all along with Windows 10. Awesome. Quite a short experiment.

Today my shiny new USB card reader arrived (thank you Amazon Prime!) so I managed to install the image on the 32 GB micro SD card. No obstacles so far, plugged it back to the Raspberry and booted up the device. After some initialization process the system arrived at the default screen for the Windows IoT Raspberry edition.


So what to do now? :-)

The samples that Microsoft provides on the IoT website are a good starting point for playing around with the device and the new operating system. So I chose the "Hello world" sample for a first try, a classic!

Before proceeding, I had to download the latest release candidate of Visual Studio 2015 (it doesn't matter whether Community or Professional edition as both have the same features) as it's required to build and deploy applications on the Raspberry.

While Visual Studio was being installed (on a Windows 10 or 8.1 machine, shouldn't make a difference from here on anymore), I had a look on the basic configuration of the Windows installation on the Raspberry using PowerShell.

This can be done by opening a PowerShell console with Administrator privileges. By issuing the following commands, a remote session with the Raspberry will be established (minwinpc is the default name of the Raspberry by the way):
net start WinRM
Set-Item WSMan:\localhost\Client\TrustedHosts -Value minwinpc
Enter-PsSession -ComputerName minwinpc -Credential minwinpc\Administrator 
The last command took about 30 seconds to return, so don't get nervous. The following command will change the computer name and reset the password, so I adapted the values to something more meaningful.
setcomputername <new-name>
net user Administrator [new password] where [new password]
schtasks /Delete /TN Microsoft\Windows\IoT\Startup /F


Finally, the device can be restarted using the well-known shutdown command:
shutdown /r /t 0


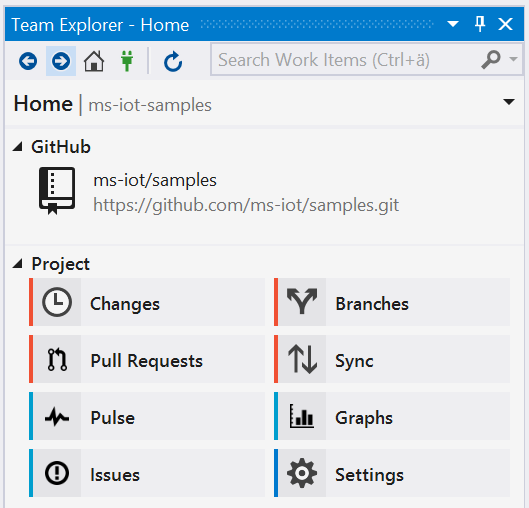
In the meantime, the Visual Studio installation had finished. As the new version comes with an updated Git client, I decided to give it a try and cloned the sample project on GitHub directly from within the IDE:


To check whether the Raspberry is up again and accepted my new configuration, I opened a web browser to access its web interface. This provides a lot more additional information and other neat features (deployment stuff, processes overview, performance monitor, etc.). The web interface is accessible via http://<device_name>/, in my case it was http://raspwin/.


As the configuration change was obviously accepted, I proceeded to the HelloWorld sample project. Opening it from the cloned Git repository will show that it's actually an Universal app, that new project type that is intended for the deployment on nearly any kind of device (classic x86/x64 desktop/notebooks, Windows Phones, ARM based devices, etc.).

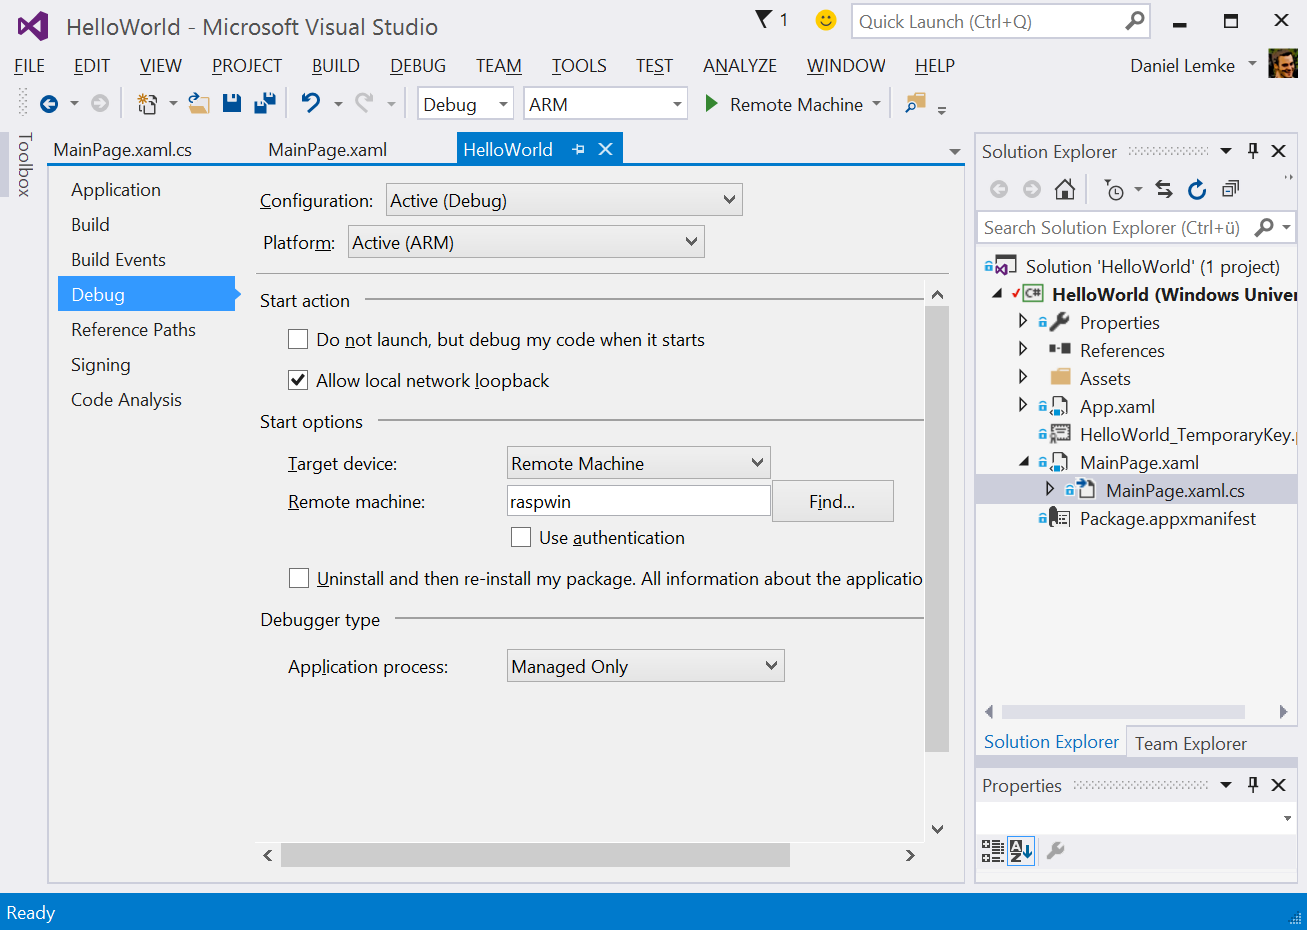
For the deployment on the Raspberry, the platform has to be changed to ARM. This can be done in the project options under Debug as shown below. This is also the right place to define the target device, which has to be set to "Remote Machine" along with the actual device name. The "Use authentication" checkbox must be unchecked.


And that's it, pressing F5 should now build and deploy the application. My TV screen switched for a moment to some kind of boot up logo before then showing the actual application.

In case that Visual Studio aborts the deployment with an error message “Unable to connect to the Microsoft Visual Studio Remote Debugger ...", you'll have either to restart the device or connect via PowerShell as described before to run the following command.
schtasks /run /tn StartMsvsmon 

Afterwards you should see two instances of the process "MSVSMON.EXE" (check via web interface or command "tlist" on PowerShell).

There we go! :)


And even the live debugging works :)


As a conclusion I would say that this was pretty easy to set up and even the remote deployment was completely painless. For a very first version of the system, not a bad start!

PS: Even no blue screen so far! ;-)

Samstag, 3. Januar 2015

How to secure a WCF web service using BasicHttpsBinding (.NET 4.5)

This article will demonstrate how an existing (non-secure) WCF client-service-application can be modified in order to establish a secure communication channel between client and service.

The first part will show how to set up a very simple WCF application that communicates via BasicHttpBinding. In the second part, the demo application will be adapted to make use of the BasicHttpsBinding which was introduced with .NET 4.5 and implements a secure communication channel that is more easy to use as when compared to the more traditional bindings such as wsHttpBinding.

The full source code of the samples can be found on GitHub:
https://github.com/lemked/simplesecurewcfapp

Part I: An unsecure demo application

The demo application will consist of two projects, one for the service and one for the client. For the sake of simplicity these are realized as console applications, but the code can easily be used in a Windows service or Desktop application for instance.

Ok, so let's create the new solution first, using "Console Application" as project type. Ensure to set the .NET Framework version to 4.5 as the BasicHttpsBinding that will be used later requires is available since that version only. Name the first project "Service" and click OK to create the solution. 


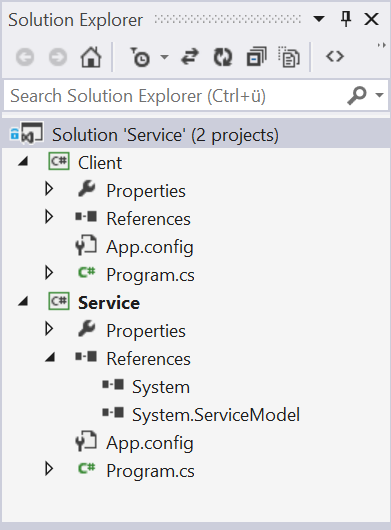
After this, add a second Console Application for the client. For both projects, you can already add a reference to the System.ServiceModel namespace which is required for any WCF related functionality.

The project in the Solution Explorer should now look somehow like shown below.


Now add a new interface "IWcfService.cs" which will define the methods that will be provided by our web service. We use a simple echo method here that will simply return the string that was entered on the client side. Ensure to add the [ServiceContract] attribute for the interface and the [OperationContract] attribute to the method itself.

using System.ServiceModel;

namespace Service
{
    [ServiceContract]
    public interface IWcfService
    {
        [OperationContract]
        string Echo(string input);
    }
}


The implementation of the interface in the new class WcfService.cs is pretty straightforward then.

using System;

namespace Service
{
    public class WcfService : IWcfService
    {
        public string Echo(string input)
        {
            Console.WriteLine("Received from client: {0}", input);
            return input;
        }
    }
}

The web service definition can now be instantiated by a ServiceHost in the service application. Let's modify the Program.cs in the Service project to accomplish this.

using System;
using System.ServiceModel;

namespace Service
{
    class Program
    {
        static void Main(string[] args)
        {
            using (var host = new ServiceHost(typeof(WcfService)))
            {
                var address = new Uri("http://localhost:9000/MyService");
                var binding = new BasicHttpBinding();
                host.AddServiceEndpoint(typeof(IWcfService), binding, address);

                host.Open();

                Console.WriteLine("Service started, press any key to finish execution.");
                Console.ReadKey();

                host.Close();
            }
        }
    }
}

The service application is now ready to use. As you can see, it will start a WCF host using a BasicHttpBinding that is listening on address "http://localhost:9000/MyService" for incoming requests. This type of implementation is also called a "self-hosting WCF service" as it doesn't require an additional platform such as an Internet Information Service (ISS) to be run.

The client implementation looks pretty simple as well. I'm not using a proxy reference or app configuration file here as this just adds some more layers of complexity. The client will use a pure programmatically implementation instead, based on the ChannelFactory class.

Before adding the following code, make sure that you've added a reference to the System.ServiceModel namespace if not yet done. In addition to that, we will now need a reference to the service project in order to have access to the IWcfService that will be required by the ChannelFactory. Proceed with the implementation of the Program.cs in the client project as follows.

using System;
using System.ServiceModel;

using Service;

namespace Client
{
    class Program
    {
        static void Main(string[] args)
        {
            var address = new EndpointAddress(new Uri("http://localhost:9000/MyService"));
            var binding = new BasicHttpBinding();
            var factory = new ChannelFactory(binding, address);

            IWcfService host = factory.CreateChannel();

            Console.WriteLine("Please enter some words or press [Esc] to exit the application.");

            while (true)
            {
                var key = Console.ReadKey();
                if (key.Key.Equals(ConsoleKey.Escape))
                {
                    return;
                }

                string input = key.KeyChar.ToString() + Console.ReadLine(); // read input

                try
                {
                    string output = host.Echo(input); // send to host, receive output
                    Console.WriteLine(output); // write output
                }
                catch(CommunicationException ex)
                {
                    Console.WriteLine(ex.Message);
                }
            }
        }
    }
}


You can now start both applications to check whether the communication works properly.


This implementation above might be fine for an educational example of how a client-server application could look like. In a real world application however you don't want your service to accept requests from any Tom, Dick or Harry. In addition to that, any communication between both parts of our sample application can easily be read from anyone that has access to the network.

To demonstrate this and to prove that the modified application in the second part of this article provides a secure communication channel, we will now deploy the client on a different machine and check the traffic that is sent to the service. Depending on your network settings, you may have to add an exception for port 9000 in your firewall first in order to allow the service to accept the client requests.

For this, we'll change the implementation of the client slightly in order to allow a different host to be specified.

        static void Main(string[] args)
        {
            Console.Write("Enter server address: ");
            var hostAddress = Console.ReadLine();

            var address = new EndpointAddress(new Uri(string.Format("http://{0}:9000/MyService", hostAddress)));
            var binding = new BasicHttpBinding();
            var factory = new ChannelFactory(binding, address);

            // ...


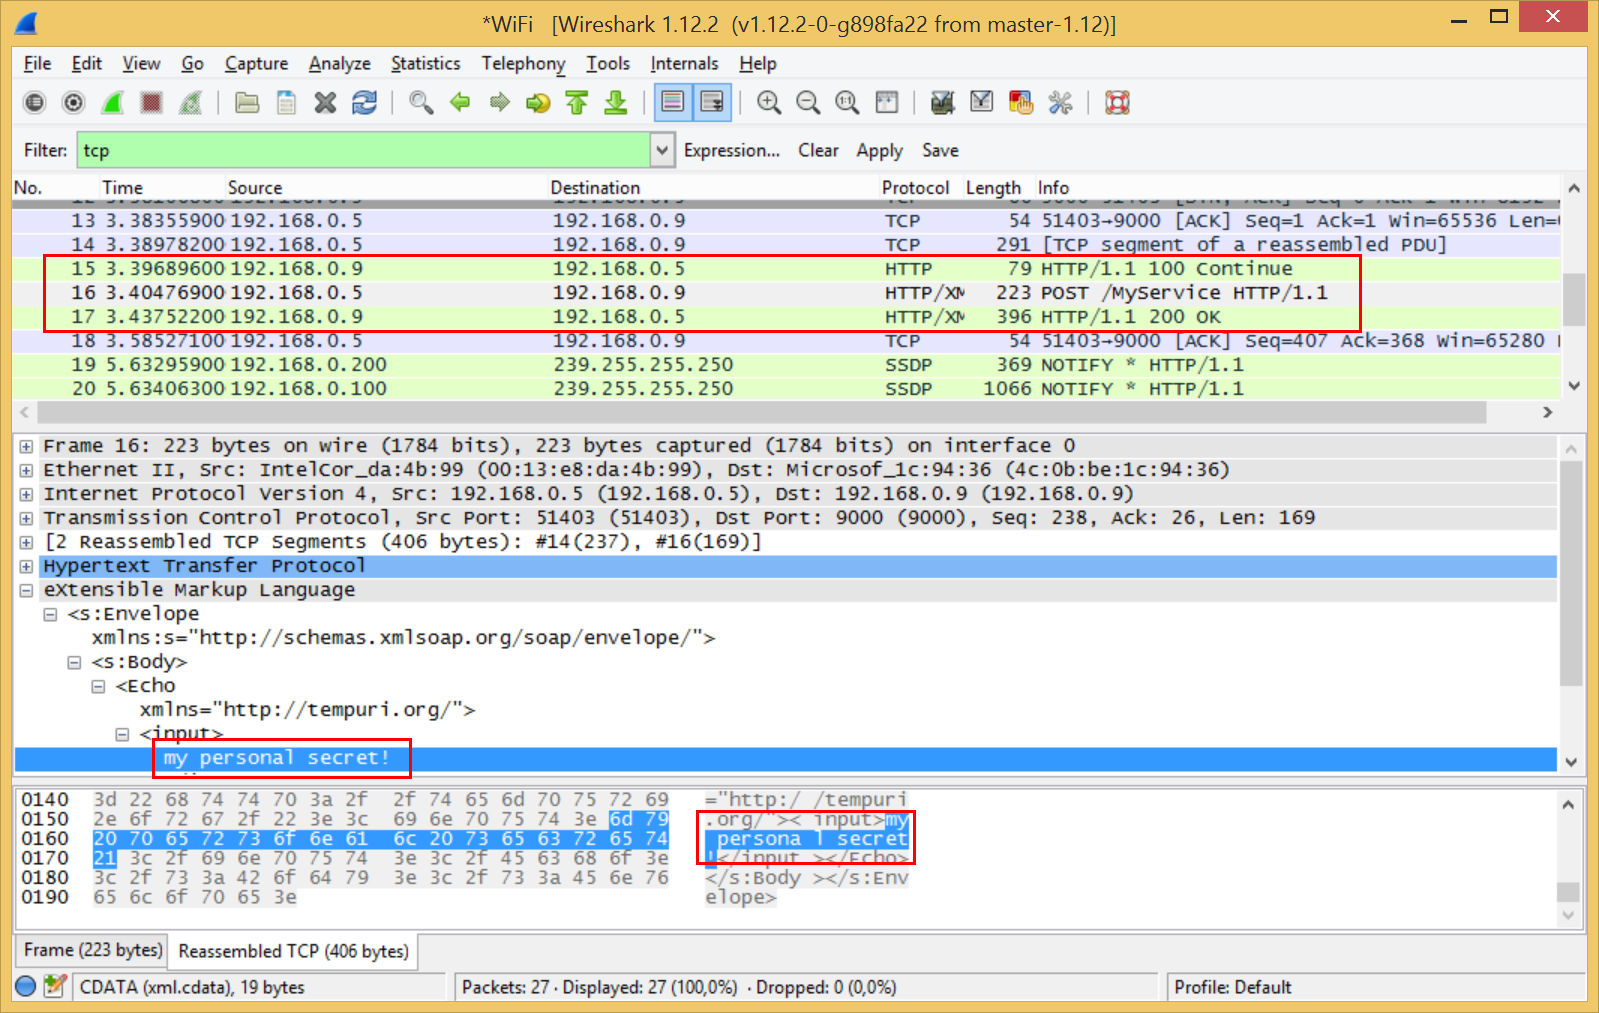
After deploying the modified version of the client on a remote machine, we can start a sniffer like WireShark to record the incoming TCP traffic.

As you can see, the "secret text" that is sent from the client to the service is transmitted in clear text over the network.


Clearly, this is something to avoid in a real-world application. So there are two additional requirements now for our sample application:
  1. Establish a secure communication channel to avoid information being sent in clear text over the network.
  2. Implement an authorization mechanism to verify if the caller has the permission to use the web service.
The second part of this article will explain how to achieve this.


Part II: Implementing a secure WCF application

The BasicHttpsBinding that we want to use secure our demo application requires a SSL certificate to establish a secure communication channel between both parts of the application. You'll find more information about this concept in this article.

SSL certificates are usually provided by a trusted authority such as VeriSign or GoDaddy. However, this service is not for free and we want to use the certificate for demonstration purposes only, so we will have to stick to a different approach: Generating a self-signed certificate.

Generating a self-signed certificate


A self-signed certificate can be generated by first creating your own Certificate Authority (CA) and then creating a certificate that is signed by this authority. The disadvantage of this is that you'll have to install that CA on each machine where the application shall be executed on as your "custom" Certificate Authority is neither available nor trusted on any other machine by default. The validation will therefore fail and the application won't be able to establish the secure communication channel.

To create your own Certificate Authority (CA), you can use the makecert.exe that is available in the Windows SDK that is installed along with Visual Studio. The tool can be called directly by opening the Developer Command Prompt. Ensure to open the prompt with administrator privileges. The following command will create the pvk file that contains the private key of the new Certificate Authority. Never share that file to anyone as it could be used to sign new certificates so that the machines where you've installed the CA on would trust those certificates. The cer file contains the public key of the Certificate Authority that can be shared to install the CA to all hosts where it is required.

makecert.exe -n "CN=DevRootCA" -r -sv DevRootCA.pvk DevRootCA.cer

Before generating a self-signed certificate, we have to install the new Certificate Authority first to the certificate store of the local machine.
  1. Run "certlm.msc" to open the certificate store of the local machine.
  2. Click Action -> All Tasks -> Import...
  3. Select the cer file that was just created, e.g. DevRoot.cer
  4. On the certificate store wizard page, click Browse and select "Trusted Root Authorities".
  5. Finish the wizard.
The CA is now trusted so we can generate our own self-signed SSL certificate now.
IMPORTANT: Change the -n parameter to the name of the host that will host the service.

makecert.exe -n "CN=surface" -iv DevRootCA.pvk -ic DevRootCA.cer -sr localmachine -ss my -sky exchange -pe DevCert.cer

The parameters -sr and -sr made sure that the certificate will be installed directly to the right place in the certificate store of the local machine. For the machine that we will use to run the client application from, we now have to install the certificates as well. So switch to your client host and proceed with the following steps:
  1. Repeat the steps from above to install your Custom Root Authority (DevRoot.cer). Of course, you have to copy the .cer file to the machine first. 
  2. Still in the certificate manager, click Action -> All Tasks -> Import...
  3. Select the .cer file from the self-signed certificate, e.g. DevCert.cer
  4. On the certificate store wizard page, click Browse and select "Personal".
  5. Finish the wizard.
Ok, that was the "painful" part of the process. Now we can tweak our application code to make use of those fancy new certificates.


Adapting the service


As we will now switch to a SSL encrypted communication, we first have to change the protocol in the URL prefix from http to https. In addition to that, we change the binding from BasicHttpBinding to BasicHttpsBinding and specify some additional parameters for the binding and the ServiceHost instance to allow a custom user credential validation. Last but not least, we have to specify the certificate that will be used by the service to encrypt the communication. 

To specify the certificate, you'll have to open the certificate store again (see steps above). Go to "Personal" and double click the self-signed certificate created before. On the "Details" tab, scroll down to the Thumbprint entry and copy the value in the property window (see the screenshot below, sorry didn't have an English Windows available right now ;)


If you paste that string into an editor such as Notepad++, you may notice that there is a special character in front of the string (switch to ANSI encoding if you don't see it). Ensure to remove it and remove any white space as well. You'll end up with a string such as "‎babfcfb80454b4611f1888cf1f4ea6c37afde70e".

We now have to add the class that will handle the validation of the given user credentials. Create a new class (e.g. CredentialsValidator) and let it derive from UserNamePasswordValidator. You'll also have to add a reference to System.IdentiyModel to resolve all references.

using System;
using System.IdentityModel.Selectors;
using System.IdentityModel.Tokens;

public class CredentialsValidator : UserNamePasswordValidator
{
    public override void Validate(string strUserName, string strPassword)
    {
        if (strUserName == null || strPassword == null)
        {
            throw new ArgumentNullException();
        }

        if (strUserName != "myUser" || strPassword != "myPassword")
        {
            throw new SecurityTokenException("Unknown Username or Password");
        }
    }
}


The implementation of the CredentialsValidator class in this sample is a bit "basic" of course. Usually you would add some more checks on the input and then validate it against a credential store (for instance from a database).

The adapted code of the service:

using System;
using System.Security.Cryptography.X509Certificates;
using System.ServiceModel;
using System.ServiceModel.Security;

namespace Service
{
    class Program
    {
        static void Main(string[] args)
        {
            using (var host = new ServiceHost(typeof(WcfService)))
            {
                var address = new Uri("https://localhost:9000/MyService");
                var binding = new BasicHttpsBinding(BasicHttpsSecurityMode.TransportWithMessageCredential);
                binding.Security.Message.ClientCredentialType = BasicHttpMessageCredentialType.UserName;

                // Attach a Certificate from the Certificate Store to the HTTP Binding
                string certThumbprint = "‎babfcfb80454b4611f1888cf1f4ea6c37afde70e";
                host.Credentials.ServiceCertificate.SetCertificate(StoreLocation.LocalMachine, StoreName.My, X509FindType.FindByThumbprint, certThumbprint);

                // Speficy a custom class that validates the passed credentials.
                host.Credentials.UserNameAuthentication.UserNamePasswordValidationMode = UserNamePasswordValidationMode.Custom;
                host.Credentials.UserNameAuthentication.CustomUserNamePasswordValidator = new CredentialsValidator();
                
                host.AddServiceEndpoint(typeof(IWcfService), binding, address);

                host.Open();

                Console.WriteLine("Service started, press any key to finish execution.");
                Console.ReadKey();

                host.Close();
            }
        }
    }
}


Adapting the client


For the client application, there is no certificate that has to be specified in the code. Instead, we just have to switch to the BasicHttpsBinding, change the protocol in the URL to https and specify the credentials for the ChannelFactory class.

using System;
using System.ServiceModel;

using Service;

namespace Client
{
    class Program
    {
        static void Main(string[] args)
        {
            Console.Write("Enter server address: ");
            var hostAddress = Console.ReadLine();

            var address = new EndpointAddress(new Uri(string.Format("https://{0}:9000/MyService", hostAddress)));
            var binding = new BasicHttpsBinding(BasicHttpsSecurityMode.TransportWithMessageCredential);
            var factory = new ChannelFactory(binding, address);

            Console.Write("Enter username: ");
            var username = Console.ReadLine();
            factory.Credentials.UserName.UserName = username;

            Console.Write("Enter password: ");
            var password = Console.ReadLine();
            factory.Credentials.UserName.Password = password;

            IWcfService host = factory.CreateChannel();

            Console.WriteLine("Please enter some words or press [Esc] to exit the application.");

            while (true)
            {
                var key = Console.ReadKey();
                if (key.Key.Equals(ConsoleKey.Escape))
                {
                    return;
                }

                string input = key.KeyChar.ToString() + Console.ReadLine(); // read input

                try
                {
                    string output = host.Echo(input); // send to host, receive output
                    Console.WriteLine("Service response: {0}", output); // write output
                }
                catch(CommunicationException ex)
                {
                    Console.WriteLine(ex.Message);
                }
            }
        }
    }
}


You should be able to compile the solution now once again. However, after starting and trying to connect to establish a connection, you will most likely run into the following exception:

"An error occurred while making the HTTP request to https://surface:9000/MyService. This could be due to the fact that the server certificate is not configured properly with HTTP.SYS in the HTTPS case. This could also be caused by a mismatch of the security binding between the client and the server."

To solve this problem, the self-signed certificate must be bound to the listener address (check this article for more information) of the machine that is hosting the web service. This can be done using the following command in an elevated command prompt. Replace the certhash with the certificate thumbprint that was already specified for the service implementation above. For the appid, you can use any GUID (use "Tools -> Create GUID" in Visual Studio for example).

netsh http add sslcert ipport=0.0.0.0:9000 certhash=babfcfb80454b4611f1888cf1f4ea6c37afde70e appid={633EFA95-D379-4C6F-AA86-F7170C7802EC}

Client and service should now be able to communicate with each other. I've copied the client to the remote host again and logged in to the service. Sending the "secret text" works without problems as shown below.


Of course, this is no prove at all that our demo application actually established a secure communication channel so let's check the network traffic again:


As you can see, the packets are no more recognized as HTTP requests/responses. Instead, the message content is completely encrypted so that neither the username/password nor the actual "secret text" that we've sent via the network can be read by the sniffer.

Great, isn't it? ;)

Related articles


Sonntag, 23. Juni 2013

IcoConverter - A small command line utility to convert .ICO files into a specific image format like .PNG or .BMP

Ever had to extract images from an .ICO file, but didn't find a simple, free tool for this task?
I have just ran into this and was quite surprised that most of the tools out there are either shareware or way too complex in my opinion.

So I had a look into the decoding/encoding capabilities of .NET and came around with a few lines of code that do exactly what I need, everything wrapped into a tiny console application.

As it might be useful for others too, I decided to extend the app a bit so that it supports multiple images formats. The full project is available on GitHub (licensed under the GNU General Public License): https://github.com/p0sti/IcoConverter

For those that don’t want to compile the project on their own, here is the standalone executable that contains all of the required assemblies:

Sample usage:


Please find the full usage information for the tool below.


Should anyone have a question about usage, found a bug, etc. please drop me a note in the comments below.

Donnerstag, 8. März 2012

hMailServer SpamAssassin Integration

Heute geht's um die Integration des hervorragenden Spam-Filters "SpamAssassin" in einen hMailServer.


Ich bin hierzu bereits auf einige andere Blogs und Foren gestoßen, allerdings wurde dort meist schwerpunktmäßig beschrieben, wie der eigentlich Unix-basierte SpamAssassin in eine Windows-Umgebung integriert werden kann.

In den Beiträgen wurde zumeist beschrieben, wie SpamAssassin unter Verwendung der Skript-Sprache Perl auf einem Windows-System kompiliert werden kann. Auch wenn hier der Bastellust durchaus Anerkennung zu zollen ist, birgt dieser Weg doch einige Nachteile: Zunächst benötigt man hier die komplette Laufzeitumgebung von Perl. Danach sollte man mit Tools wie nmake und gcc vertraut sein und in der Lage sein unter Zuhilfenahme des Quellcodes der offiziellen Apache Seite ein eigenes Kompilat zu erzeugen. Der große Nachteil hierbei sind die hierfür notwendigen Perl-Module: Da diese für Windows oft nicht vorkompiliert erhältlich sind, muss man wiederum selbst Hand anlegen. Das heißt Modul suchen, herunterladen, und in den allermeisten Fällen ein paar notwendige Änderungen an deren Quellcode vornehmen, damit sie unter Windows fehlerfrei kompiliert werden können. Selbst wenn dieser Schritt gelingt, sind am Quellcode von SpamAssasin noch einige Änderungen vorzunehmen, damit dieser unter einem Windows-System annähernd stabil funktioniert.

Die andere, oft zu sehende Variante ist die Verwendung von SaWin32. Dort erhält man nebst vorkompiliertem SpamAssasin samt Runtime einen netten Mail Proxy zur einfachen Handhabung für den Endanwender. Leider ist das Projekt vor 5 Jahren eingestellt worden, entsprechend veraltet ist der dort vorzufindende SpamAssassin (Version 3.2.3). Die aktuelle Version ist 3.3.2. Auch wenn die Versionsnummer etwas anderes suggeriert: Der Unterschied bei der Erkennung von Spam ist gewaltig. Ich bin nicht mal sicher ob man in der Version 3.2.3 überhaupt noch von Spam-Filterung sprechen kann. Aktuelle Anti-Spam-Regeln wurden hierfür meines Wissens jedenfalls schon seit einer Ewigkeit nicht mehr veröffentlicht.

Sparen wir uns das also alles und nutzen den einfacheren Weg: "SpamAssassin for Windows"
Hierunter verbirgt sich eine aktuelle und ebenfalls vorkompilierte Windows-Variante von SpamAssassin, die ich im Zuge eines Praxissemesters beim Unternehmen JAM Software entwickelt habe.

Der Grund zur Verwendung von hMailServer liegt in dessen nativer Unterstützung eines SpamAssassin-Interfaces. Sofern Mail-Server und Spam-Filter auf dem gleichen Host laufen, gestaltet sich eine Installation und Konfiguration der beiden Komponenten extrem einfach.

Kommen wir zur Vorgehensweise:
  1. hMailServer herunterladen und installieren:
    http://www.hmailserver.com/index.php?page=download
  2. SpamAssassin for Windows herunterladen und installieren:
    http://www.jam-software.de/spamassassin/download.shtml
  3. Nach der Installation öffnet man eine Eingabeaufforderung und wechselt zum Installationsverzeichnis von SpamAssassin for Windows.
  4. Den SpamAssassin Daemon starten: spamd.exe


    Ggf. wird hier eine Firewall-Warnung erscheinen, diese sollte bestätigt werden um die Verwendung Netzwerk-basierter Spam-Tests zu ermöglichen.


  5. Wechsel zum hMailServer und dort unter Settings --> Anti-Spam  unter dem Reiter "SpamAssassin" das Häkchen bei "Use SpamAssassin" setzen. Mit dem Button "Test" kann nun die Funktionalität des Spam-Filters überprüft werden. 


Wenn alles funktioniert hat, sollten sowohl hMailServer als auch SpamAssassin eine Rückmeldung über die Verarbeitung der Test-Mail zurückgegeben:


Der unter X-Spam-Score angegebene Wert gibt Auskunft über den erreichten Spam-Score. Hier gilt, je höher de Wert, desto eher handelt es sich um Spam. In der Regel gilt eine E-Mail bei SpamAssassin ab einem Wert von 5 Punkten als Spam. Der extrem hohe Wert von 1000 wurde hier aufgrund der speziellen GTUBE-Regel erreicht, mit der Spam-Filter auf ihre Funktionalität hin überprüft werden.


Das war's soweit zur Integration des Spam-Filters. Es sei noch gesagt, dass man SpamAssassin am besten also Windows-Dienst betreiben sollte, da er mit der Zeit einen sehr hohen Speicherverbrauch aufweisen und somit instabil werden kann. Die Integration als Systemdienst soll hier allerdings nicht thematisiert werden.

Montag, 16. Januar 2012

Einfacher, selbsthostender WCF Server mit Client in C#

Dies ist mein erster Blog-Post und soll den Anfang für eine kleine HowTo-Sammlung bilden, die ich zur Archivierung für mich selbst, aber auch für alle anderen Interessierten hier ablegen möchte.

Die Themen werden sich vor allem, aber nicht ausschließlich, mit der Anwendungsentwicklung mit C# innerhalb von Visual Studio beschäftigen.

Der heutige Post wird ein extrem einfaches aber recht schönes Beispiel zur Erstellung eines selbsthostenden WCF Hosts zeigen. Daneben wird außerdem gezeigt, wie man mit einem kleinen Client auf die Methoden des Hosts zugreifen kann.

Für diejenigen, die sich noch nicht mit WCF beschäftigt haben: WCF steht für "Windows Communication Foundation" und stellt ein leistungsfähiges Framework innerhalb von .NET dar, mit welchem man auf sehr einfache Art und Weise Server/Client-Anwendungen realisieren kann.

Warum hierzu ein weiterer Blog-Post, obwohl im Internet bereits unzählige existieren, die sich mit diesem Thema beschäftigen? Ich wollte für ein kleines Privat-Projekt einen WCF Server/Client erstellen, konnte aber im Internet kein aktuelles, einfaches aber dennoch schönes Beispiel-Projekt finden. Die Quellen derer ich mich während der Recherche bedient habe waren die folgenden:

http://bebugsblog.blogspot.com/2010/01/wcf-tutorial-1.html
http://www.codeproject.com/KB/WCF/WCFexample.aspx
http://bloggingabout.net/blogs/dennis/archive/2010/06/16/wcf-simple-example-in-visual-studio-2010.aspx

Die Anforderungen, die ich an mein eigenes Projekt im voraus gestellt habe, konnten die obigen Beispiele leider nicht vollständig abbilden. Wer möchte kann den Teil auch überspringen, hier die Gründe im Detail ;)


Möglichst einfache aber solide Architektur
Im Blog-Eintrag von beBug wird mit zwei einfachen Konsolen-Anwendungen begonnen, was mir sehr gut gefallen hat. Leider wird im Verlauf des Beispiels sehr viel mit Konfigurationstools gearbeitet, die für ein einfaches und vor allem für das Verstehen der Funktionsweise von WCF gedachten Beispiels recht ungeeignet sind. Die Arbeit mit den XML-basierten Konfigurationsdateien wird in meinem Beispiel daher bewusst ausgelassen. Die zweite Quelle, ein Code-Projekt Beispiel, liefert ebenfalls einen vielversprechenden Ansatz, war aber zum Einen etwas aufgeblasen für ein möglichst einfaches Einstiegsprojekt und zum Anderen etwas veraltet, wodurch ich zunächst nicht sicher war, ob mit Visual Studio 2010 größere Änderungen notwendig wären.

Keine Verwendung von svcutil oder Service Reference
In vielen Anleitungen, wie auch in der letzten Quelle, findet man die Verwendung der svcutil.exe (ServiceModel Metadata Utility Tool) oder einer Service-Referenz. Der Zweck hiervon ist es, die vom Host veröffentlichten Methoden im Client nutzen zu können. Der klare Nachteil der beiden Möglichkeiten ist ihre Inflexibilität. Wenn durch den Host eine neue Methode implementiert, oder eine vorhandene geändert wird, so muss man das svcutil erneut ausführen oder die Service-Referenz aktualisieren. Wenn man proprietäre Web-Services wie die von Amazon verwendet ist das völlig ausreichend. Für mein eigenes kleines Projekt wollte ich aber eine Lösung, bei der die Client-Anwendung die Methoden des Hosts in der Entwicklungsumgebung unmittelbar nutzen kann.


Erstellen des Projekts

Nun zum eigentlichen Beispiel: Wir beginnen mit der Erstellung der Solution. Hierfür sollte sichergestellt werden, dass Visual Studio im Administrator-Modus gestartet wurde, ansonsten schlägt das Erstellen des Netzwerk-Sockets im Verlaufe des Beispiels fehl. Sowohl für Host als auch für Client wird hierfür der Einfachheit halber eine Konsolenanwendung verwendet. Wie man die Projekte in einen Windows-Dienst und eine Windows Forms Anwendung portiert versuche ich in einem späteren Post zu zeigen. Zunächst erstellen wir also die Solution, zusammen mit dem WcfHost-Projekt:


Die Interface-Klasse

Nach dem Erzeugen der Solution fügen wir eine neue Class-Datei namens IWcfHost.cs hinzu und fügen dem Projekt eine Referenz zu System.ServiceModel hinzu. System.ServiceModel stellt viele der benötigten Methoden und Schnittstellen für die Erstellung von Server/Client basierten Architekturen bereit.


Zunächst wird aus der Klasse ein Interface gemacht und bekommt zwei einfache Methoden verpasst. Die Implementierung der Methoden wird gleich sauber in einer neuen eigenen Klasse bereitgestellt. Außerdem muss noch die System.ServiceModel Referenz in den usings hinzugefügt werden. Diese wird hier für die Attribute [ServiceContract] und [OperationContract] benötigt. Mithilfe der beiden Attribute wird bekannt gemacht, dass unser Interface und die beiden definierten Methoden Teil des Dienstvertrags zwischen Host und Client sein sollen. Der Dienstvertrag ist notwendig, damit Host und Client wissen, welche Art von Parameter und Rückgabewert durch die Gegenseite erwartet bzw. bereitgestellt werden.

using System.ServiceModel;

namespace WcfHost
{
    [ServiceContract]
    public interface IWcfHost
    {
        [OperationContract]
        string Echo(string pString);

        [OperationContract]
        int Sum(int pNum1, int pNum2);
    }
}


Implementierung der Interface-Methoden

Für die Implementierung der Interface-Methoden wird jetzt eine neue Klasse WcfHost erzeugt, welche das zuvor erstellte Interface IWcfHost implementiert. Nachdem wiederum die System.ServiceModel Assembly zu den usings hinzugefügt wurde, kann die Implementierung der zuvor definierten Methoden eingefügt werden. Das Attribut [ServiceBehavior(IncludeExceptionDetailInFaults = true)] ist optional und erleichtert eine detaillierte Fehlerdiagnose durch das Hinzufügen von Fehlerinformationen im Falle eines auftretenden Problems im Host. 

using System;
using System.ServiceModel;

namespace WcfHost
{
    [ServiceBehavior(IncludeExceptionDetailInFaults = true)]
    public class WcfHost : IWcfHost
    {
        public string Echo(string pString)
        {
            return String.Format("You've entered: {0}", pString);
        }

        public int Sum(int pNum1, int pNum2)
        {
            return pNum1 + pNum2;
        }
    }
}


Start des WCF-Hosts

Nach dem Erstellen des Interfaces und der Implementierung der Methoden kann der WCF-Host nun gestartet werden. Dafür wird in die Program.cs gewechselt und der folgende Code der Main-Methode hinzugefügt.

using System;
using System.ServiceModel;

namespace WcfHost
{
    class Program
    {
        static void Main(string[] args)
        {
             using (ServiceHost host = new ServiceHost(typeof(WcfHost)))
            {
                Uri baseAddress = new Uri("net.tcp://localhost:8999/MyService");
                NetTcpBinding binding = new NetTcpBinding();
                host.AddServiceEndpoint(typeof(IWcfHost), binding, baseAddress);
                host.Open();

                Console.WriteLine("Service started, press any key to finish execution.");
                Console.ReadKey();
                host.Close();
            }
        }
    }
}

Kurz zur Erklärung: Die ServiceHost Variable wird wie der Name schon sagt für das Hosten unseres Diensts verwendet. Dabei ist die Angabe des Typs unserer zuvor erstellten Klasse notwendig. Danach wird die Adresse definiert, unter der unser Host später erreichbar sein soll. Die Kommunikation zwischen Host und Client verläuft TCP basiert, entsprechend beginnt die Uri mit "net.tcp". Das "MyService" am Ende definiert den genauen Endpunkt, auf dem der WCF-Host Anfragen entgegennimmt. Prinzipiell könnte man hier später weitere Endpunkte hinzufügen, für unser Beispiel ist das aber nicht notwendig.
Nach dem Hinzufügen des Endpunkts, kann der ServiceHost "geöffnet" werden. Mit dem Console.Readkey() wird verhindert, dass sich der Host gleich wieder beendet.

Damit ist unser Host fertiggestellt. Er kann jetzt ausgeführt werden, woraufhin eventuell eine Firewall-Anfrage aufpoppt die bestätigt werden sollte, damit Server und Client miteinander kommunizieren können.


Hinzufügen des Client-Projekts

Der Client wird genau wie der Host als Konsolen-Anwendung implementiert. In der Solution wird daher zunächst ein neues Projekt vom Typ Konsolen-Anwendung hinzugefügt und beispielsweise WcfClient genannt. Damit Host und Client gleichzeitig gestartet werden können, sollte in den Eigenschaften der Solution  außerdem die Option "Multiple startup projects" ausgewählt und die beiden Projekte auf "Start" eingestellt werden.


Als Projekt-Referenzen wird neben System.ServiceModel nun außerdem unser Host-Projekt "WcfHost" benötigt:


Die Implementierung der main-Methode des Clients ist erstaunlich simpel. Wir benötigen lediglich die Adresse des TCP-Endpunkts und eine ChannelFactory, um einen Kanal zum Host aufbauen und verwenden zu können. Die von der Factory erzeugte Instanz weisen wir einer Klassenvariable vom bereits bekannten Interface IWcfHost zu. Hiermit können jetzt die Methoden aus der Host-Klasse unmittelbar verwendet werden.

using System;
using System.Text;
using System.ServiceModel;
using WcfHost;

namespace WcfClient
{
    class Program
    {
        private static IWcfHost host = null;

        static void Main(string[] args)
        {   
            Uri baseAddress = new Uri("net.tcp://localhost:8999/MyService");
            EndpointAddress address = new EndpointAddress(baseAddress);
            NetTcpBinding binding = new NetTcpBinding();
            ChannelFactory<IWcfHost> factory = new ChannelFactory<IWcfHost>(binding, address);
            host = factory.CreateChannel();

            Console.WriteLine("Please enter some words.");
            string input = Console.ReadLine(); // read input
            string output = host.Echo(input); // send to host, receive output
            Console.WriteLine(output); // write output

            int sum = host.Sum(5, 8);
            Console.WriteLine(sum);

            Console.ReadKey();
        }
    }
}


Ergebnis

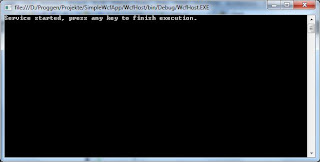
Somit ist unser Projekt fertiggestellt und kann gestartet werden. Nach dem Buildvorgang sollten beide Applikationen selbstständig starten. Der Host wartet nach dem Start auf Anfragen während der Client von uns eine Tastatureingabe erwartet die er an den Host weiterleiten möchte:


Nach der Eingabe von ein paar Wörtern erhalten wir vom Host eine Rückgabe zusammen mit dem Ergebnis aus der Beispiel-Addition aus unserer Main-Methode.


Das vollständige Projekt kann über diesen Link heruntergeladen werden:
https://skydrive.live.com/?cid=d5f85d5594cec9d9&id=D5F85D5594CEC9D9%21133#

Das war's dann für heute, ich hoffe der Post konnte dem ein oder anderem weiterhelfen!

Liebe Grüße
Daniel