This article will demonstrate how an existing (non-secure) WCF client-service-application can be modified in order to establish a secure communication channel between client and service.
The first part will show how to set up a very simple WCF application that communicates via
BasicHttpBinding. In the second part, the demo application will be adapted to make use of the BasicHttpsBinding which was introduced with .NET 4.5 and implements a secure communication channel that is more easy to use as when compared to the more traditional bindings such as wsHttpBinding.
https://github.com/lemked/simplesecurewcfapp
Part I: An unsecure demo application
The demo application will consist of two projects, one for the service and one for the client. For the sake of simplicity these are realized as console applications, but the code can easily be used in a Windows service or Desktop application for instance.
Ok, so let's create the new solution first, using "Console Application" as project type. Ensure to set the .NET Framework version to 4.5 as the BasicHttpsBinding that will be used later requires is available since that version only. Name the first project "Service" and click OK to create the solution.

After this, add a second Console Application for the client. For both projects, you can already add a reference to the System.ServiceModel namespace which is required for any WCF related functionality.
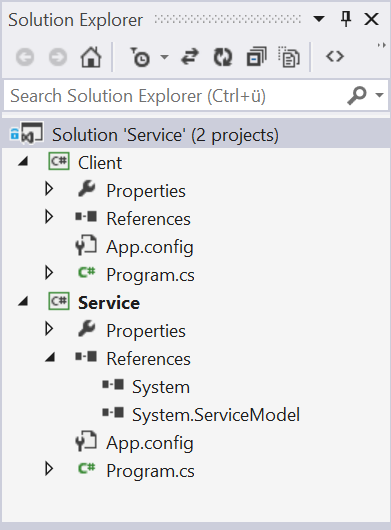
The project in the Solution Explorer should now look somehow like shown below.
Now add a new interface "IWcfService.cs" which will define the methods that will be provided by our web service. We use a simple echo method here that will simply return the string that was entered on the client side. Ensure to add the [ServiceContract] attribute for the interface and the [OperationContract] attribute to the method itself.
The implementation of the interface in the new class WcfService.cs is pretty straightforward then.
The web service definition can now be instantiated by a ServiceHost in the service application. Let's modify the Program.cs in the Service project to accomplish this.
The service application is now ready to use. As you can see, it will start a WCF host using a BasicHttpBinding that is listening on address "http://localhost:9000/MyService" for incoming requests. This type of implementation is also called a "self-hosting WCF service" as it doesn't require an additional platform such as an Internet Information Service (ISS) to be run.
The client implementation looks pretty simple as well. I'm not using a proxy reference or app configuration file here as this just adds some more layers of complexity. The client will use a pure programmatically implementation instead, based on the ChannelFactory class.
Before adding the following code, make sure that you've added a reference to the System.ServiceModel namespace if not yet done. In addition to that, we will now need a reference to the service project in order to have access to the IWcfService that will be required by the ChannelFactory. Proceed with the implementation of the Program.cs in the client project as follows.
You can now start both applications to check whether the communication works properly.

This implementation above might be fine for an educational example of how a client-server application could look like. In a real world application however you don't want your service to accept requests from any Tom, Dick or Harry. In addition to that, any communication between both parts of our sample application can easily be read from anyone that has access to the network.
To demonstrate this and to prove that the modified application in the second part of this article provides a secure communication channel, we will now deploy the client on a different machine and check the traffic that is sent to the service. Depending on your network settings, you may have to add an exception for port 9000 in your firewall first in order to allow the service to accept the client requests.
For this, we'll change the implementation of the client slightly in order to allow a different host to be specified.
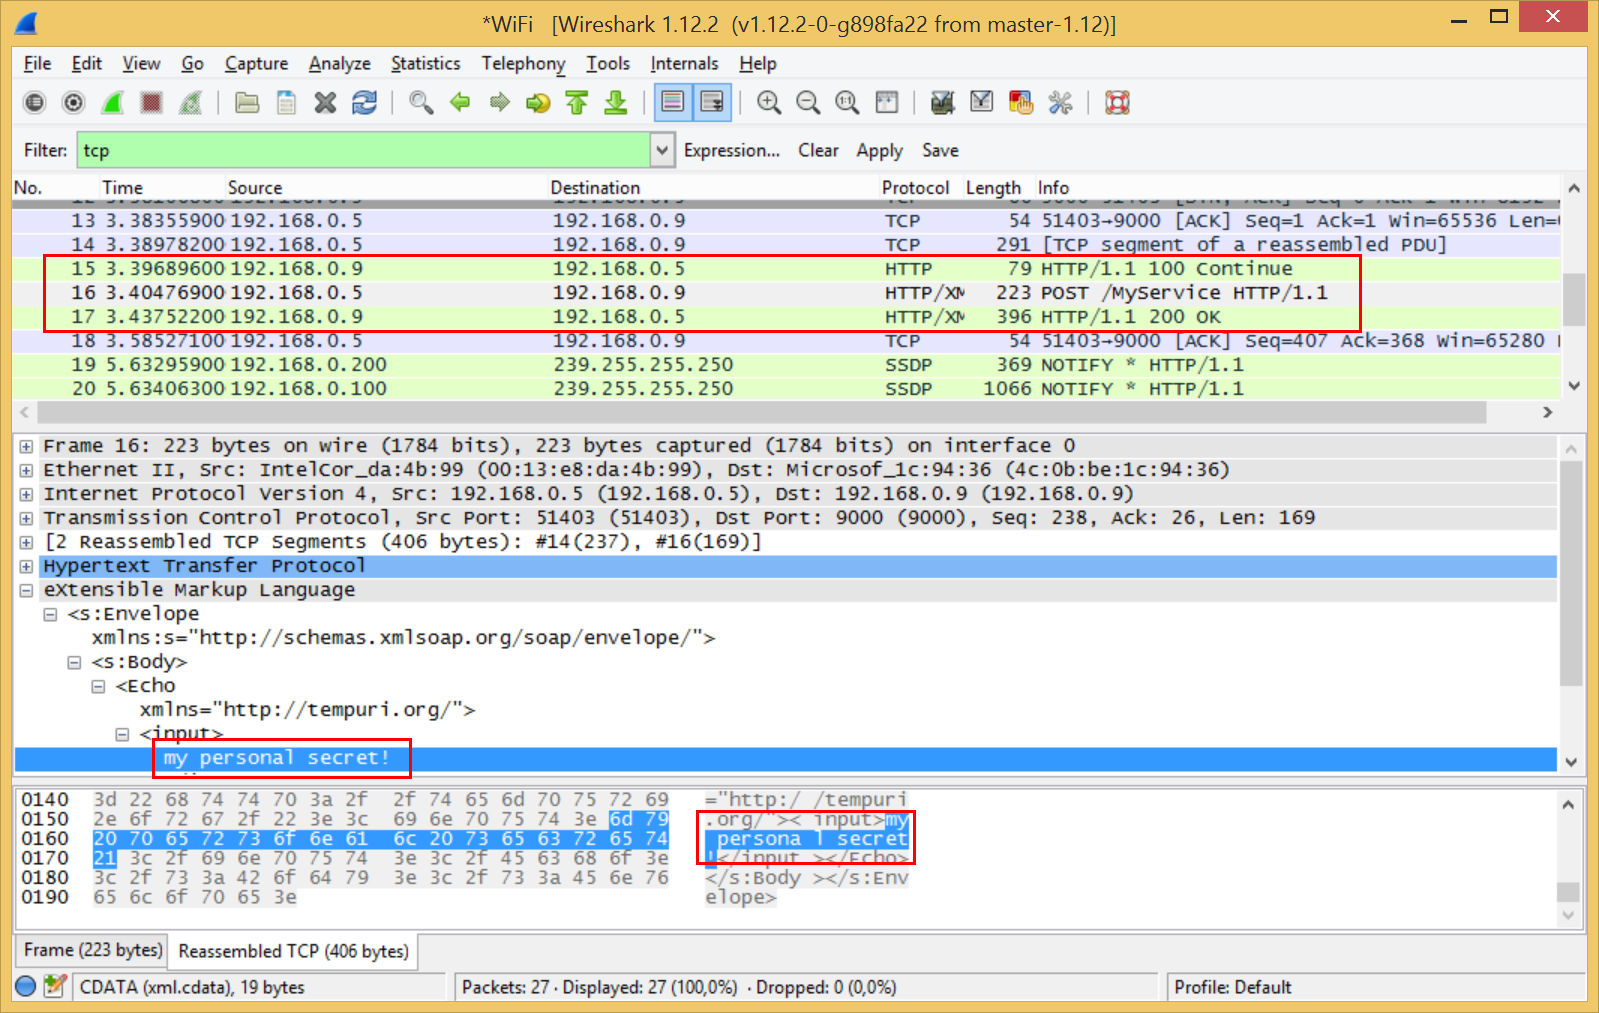
After deploying the modified version of the client on a remote machine, we can start a sniffer like WireShark to record the incoming TCP traffic.
As you can see, the "secret text" that is sent from the client to the service is transmitted in clear text over the network.

Clearly, this is something to avoid in a real-world application. So there are two additional requirements now for our sample application:

If you paste that string into an editor such as Notepad++, you may notice that there is a special character in front of the string (switch to ANSI encoding if you don't see it). Ensure to remove it and remove any white space as well. You'll end up with a string such as "babfcfb80454b4611f1888cf1f4ea6c37afde70e".
We now have to add the class that will handle the validation of the given user credentials. Create a new class (e.g. CredentialsValidator) and let it derive from UserNamePasswordValidator. You'll also have to add a reference to System.IdentiyModel to resolve all references.
The implementation of the CredentialsValidator class in this sample is a bit "basic" of course. Usually you would add some more checks on the input and then validate it against a credential store (for instance from a database).
The adapted code of the service:
For the client application, there is no certificate that has to be specified in the code. Instead, we just have to switch to the BasicHttpsBinding, change the protocol in the URL to https and specify the credentials for the ChannelFactory class.
You should be able to compile the solution now once again. However, after starting and trying to connect to establish a connection, you will most likely run into the following exception:
"An error occurred while making the HTTP request to https://surface:9000/MyService. This could be due to the fact that the server certificate is not configured properly with HTTP.SYS in the HTTPS case. This could also be caused by a mismatch of the security binding between the client and the server."
To solve this problem, the self-signed certificate must be bound to the listener address (check this article for more information) of the machine that is hosting the web service. This can be done using the following command in an elevated command prompt. Replace the certhash with the certificate thumbprint that was already specified for the service implementation above. For the appid, you can use any GUID (use "Tools -> Create GUID" in Visual Studio for example).
netsh http add sslcert ipport=0.0.0.0:9000 certhash=babfcfb80454b4611f1888cf1f4ea6c37afde70e appid={633EFA95-D379-4C6F-AA86-F7170C7802EC}
Client and service should now be able to communicate with each other. I've copied the client to the remote host again and logged in to the service. Sending the "secret text" works without problems as shown below.


Of course, this is no prove at all that our demo application actually established a secure communication channel so let's check the network traffic again:

As you can see, the packets are no more recognized as HTTP requests/responses. Instead, the message content is completely encrypted so that neither the username/password nor the actual "secret text" that we've sent via the network can be read by the sniffer.
Great, isn't it? ;)
The project in the Solution Explorer should now look somehow like shown below.
Now add a new interface "IWcfService.cs" which will define the methods that will be provided by our web service. We use a simple echo method here that will simply return the string that was entered on the client side. Ensure to add the [ServiceContract] attribute for the interface and the [OperationContract] attribute to the method itself.
using System.ServiceModel;

namespace Service
{
    [ServiceContract]
    public interface IWcfService
    {
        [OperationContract]
        string Echo(string input);
    }
}
The implementation of the interface in the new class WcfService.cs is pretty straightforward then.
using System;

namespace Service
{
    public class WcfService : IWcfService
    {
        public string Echo(string input)
        {
            Console.WriteLine("Received from client: {0}", input);
            return input;
        }
    }
}
The web service definition can now be instantiated by a ServiceHost in the service application. Let's modify the Program.cs in the Service project to accomplish this.
using System;
using System.ServiceModel;

namespace Service
{
    class Program
    {
        static void Main(string[] args)
        {
            using (var host = new ServiceHost(typeof(WcfService)))
            {
                var address = new Uri("http://localhost:9000/MyService");
                var binding = new BasicHttpBinding();
                host.AddServiceEndpoint(typeof(IWcfService), binding, address);

                host.Open();

                Console.WriteLine("Service started, press any key to finish execution.");
                Console.ReadKey();

                host.Close();
            }
        }
    }
}
The service application is now ready to use. As you can see, it will start a WCF host using a BasicHttpBinding that is listening on address "http://localhost:9000/MyService" for incoming requests. This type of implementation is also called a "self-hosting WCF service" as it doesn't require an additional platform such as an Internet Information Service (ISS) to be run.
The client implementation looks pretty simple as well. I'm not using a proxy reference or app configuration file here as this just adds some more layers of complexity. The client will use a pure programmatically implementation instead, based on the ChannelFactory class.
Before adding the following code, make sure that you've added a reference to the System.ServiceModel namespace if not yet done. In addition to that, we will now need a reference to the service project in order to have access to the IWcfService that will be required by the ChannelFactory. Proceed with the implementation of the Program.cs in the client project as follows.
using System;
using System.ServiceModel;

using Service;

namespace Client
{
    class Program
    {
        static void Main(string[] args)
        {
            var address = new EndpointAddress(new Uri("http://localhost:9000/MyService"));
            var binding = new BasicHttpBinding();
            var factory = new ChannelFactory(binding, address);

            IWcfService host = factory.CreateChannel();

            Console.WriteLine("Please enter some words or press [Esc] to exit the application.");

            while (true)
            {
                var key = Console.ReadKey();
                if (key.Key.Equals(ConsoleKey.Escape))
                {
                    return;
                }

                string input = key.KeyChar.ToString() + Console.ReadLine(); // read input

                try
                {
                    string output = host.Echo(input); // send to host, receive output
                    Console.WriteLine(output); // write output
                }
                catch(CommunicationException ex)
                {
                    Console.WriteLine(ex.Message);
                }
            }
        }
    }
}
You can now start both applications to check whether the communication works properly.
This implementation above might be fine for an educational example of how a client-server application could look like. In a real world application however you don't want your service to accept requests from any Tom, Dick or Harry. In addition to that, any communication between both parts of our sample application can easily be read from anyone that has access to the network.
To demonstrate this and to prove that the modified application in the second part of this article provides a secure communication channel, we will now deploy the client on a different machine and check the traffic that is sent to the service. Depending on your network settings, you may have to add an exception for port 9000 in your firewall first in order to allow the service to accept the client requests.
For this, we'll change the implementation of the client slightly in order to allow a different host to be specified.
        static void Main(string[] args)
        {
            Console.Write("Enter server address: ");
            var hostAddress = Console.ReadLine();

            var address = new EndpointAddress(new Uri(string.Format("http://{0}:9000/MyService", hostAddress)));
            var binding = new BasicHttpBinding();
            var factory = new ChannelFactory(binding, address);

            // ...
After deploying the modified version of the client on a remote machine, we can start a sniffer like WireShark to record the incoming TCP traffic.
As you can see, the "secret text" that is sent from the client to the service is transmitted in clear text over the network.
Clearly, this is something to avoid in a real-world application. So there are two additional requirements now for our sample application:
- Establish a secure communication channel to avoid information being sent in clear text over the network.
- Implement an authorization mechanism to verify if the caller has the permission to use the web service.
The second part of this article will explain how to achieve this.
Part II: Implementing a secure WCF application
The BasicHttpsBinding that we want to use secure our demo application requires a SSL certificate to establish a secure communication channel between both parts of the application. You'll find more information about this concept in this article.
SSL certificates are usually provided by a trusted authority such as VeriSign or GoDaddy. However, this service is not for free and we want to use the certificate for demonstration purposes only, so we will have to stick to a different approach: Generating a self-signed certificate.
Generating a self-signed certificate
A self-signed certificate can be generated by first creating your own Certificate Authority (CA) and then creating a certificate that is signed by this authority. The disadvantage of this is that you'll have to install that CA on each machine where the application shall be executed on as your "custom" Certificate Authority is neither available nor trusted on any other machine by default. The validation will therefore fail and the application won't be able to establish the secure communication channel.
To create your own Certificate Authority (CA), you can use the makecert.exe that is available in the Windows SDK that is installed along with Visual Studio. The tool can be called directly by opening the Developer Command Prompt. Ensure to open the prompt with administrator privileges. The following command will create the pvk file that contains the private key of the new Certificate Authority. Never share that file to anyone as it could be used to sign new certificates so that the machines where you've installed the CA on would trust those certificates. The cer file contains the public key of the Certificate Authority that can be shared to install the CA to all hosts where it is required.
makecert.exe -n "CN=DevRootCA" -r -sv DevRootCA.pvk DevRootCA.cer
Before generating a self-signed certificate, we have to install the new Certificate Authority first to the certificate store of the local machine.
- Run "certlm.msc" to open the certificate store of the local machine.
- Click Action -> All Tasks -> Import...
- Select the cer file that was just created, e.g. DevRoot.cer
- On the certificate store wizard page, click Browse and select "Trusted Root Authorities".
- Finish the wizard.
The CA is now trusted so we can generate our own self-signed SSL certificate now.
IMPORTANT: Change the -n parameter to the name of the host that will host the service.
IMPORTANT: Change the -n parameter to the name of the host that will host the service.
makecert.exe -n "CN=surface" -iv DevRootCA.pvk -ic DevRootCA.cer -sr localmachine -ss my -sky exchange -pe DevCert.cer
The parameters -sr and -sr made sure that the certificate will be installed directly to the right place in the certificate store of the local machine. For the machine that we will use to run the client application from, we now have to install the certificates as well. So switch to your client host and proceed with the following steps:
- Repeat the steps from above to install your Custom Root Authority (DevRoot.cer). Of course, you have to copy the .cer file to the machine first.
- Still in the certificate manager, click Action -> All Tasks -> Import...
- Select the .cer file from the self-signed certificate, e.g. DevCert.cer
- On the certificate store wizard page, click Browse and select "Personal".
- Finish the wizard.
Ok, that was the "painful" part of the process. Now we can tweak our application code to make use of those fancy new certificates.
Adapting the service
As we will now switch to a SSL encrypted communication, we first have to change the protocol in the URL prefix from http to https. In addition to that, we change the binding from BasicHttpBinding to BasicHttpsBinding and specify some additional parameters for the binding and the ServiceHost instance to allow a custom user credential validation. Last but not least, we have to specify the certificate that will be used by the service to encrypt the communication.
To specify the certificate, you'll have to open the certificate store again (see steps above). Go to "Personal" and double click the self-signed certificate created before. On the "Details" tab, scroll down to the Thumbprint entry and copy the value in the property window (see the screenshot below, sorry didn't have an English Windows available right now ;)
To specify the certificate, you'll have to open the certificate store again (see steps above). Go to "Personal" and double click the self-signed certificate created before. On the "Details" tab, scroll down to the Thumbprint entry and copy the value in the property window (see the screenshot below, sorry didn't have an English Windows available right now ;)
We now have to add the class that will handle the validation of the given user credentials. Create a new class (e.g. CredentialsValidator) and let it derive from UserNamePasswordValidator. You'll also have to add a reference to System.IdentiyModel to resolve all references.
using System;
using System.IdentityModel.Selectors;
using System.IdentityModel.Tokens;

public class CredentialsValidator : UserNamePasswordValidator
{
    public override void Validate(string strUserName, string strPassword)
    {
        if (strUserName == null || strPassword == null)
        {
            throw new ArgumentNullException();
        }

        if (strUserName != "myUser" || strPassword != "myPassword")
        {
            throw new SecurityTokenException("Unknown Username or Password");
        }
    }
}
The implementation of the CredentialsValidator class in this sample is a bit "basic" of course. Usually you would add some more checks on the input and then validate it against a credential store (for instance from a database).
The adapted code of the service:
using System;
using System.Security.Cryptography.X509Certificates;
using System.ServiceModel;
using System.ServiceModel.Security;
namespace Service
{
class Program
{
static void Main(string[] args)
{
using (var host = new ServiceHost(typeof(WcfService)))
{
var address = new Uri("https://localhost:9000/MyService");
var binding = new BasicHttpsBinding(BasicHttpsSecurityMode.TransportWithMessageCredential);
binding.Security.Message.ClientCredentialType = BasicHttpMessageCredentialType.UserName;
// Attach a Certificate from the Certificate Store to the HTTP Binding
string certThumbprint = "babfcfb80454b4611f1888cf1f4ea6c37afde70e";
host.Credentials.ServiceCertificate.SetCertificate(StoreLocation.LocalMachine, StoreName.My, X509FindType.FindByThumbprint, certThumbprint);
// Speficy a custom class that validates the passed credentials.
host.Credentials.UserNameAuthentication.UserNamePasswordValidationMode = UserNamePasswordValidationMode.Custom;
host.Credentials.UserNameAuthentication.CustomUserNamePasswordValidator = new CredentialsValidator();
host.AddServiceEndpoint(typeof(IWcfService), binding, address);
host.Open();
Console.WriteLine("Service started, press any key to finish execution.");
Console.ReadKey();
host.Close();
}
}
}
}
Adapting the client
using System;
using System.ServiceModel;

using Service;

namespace Client
{
    class Program
    {
        static void Main(string[] args)
        {
            Console.Write("Enter server address: ");
            var hostAddress = Console.ReadLine();

            var address = new EndpointAddress(new Uri(string.Format("https://{0}:9000/MyService", hostAddress)));
            var binding = new BasicHttpsBinding(BasicHttpsSecurityMode.TransportWithMessageCredential);
            var factory = new ChannelFactory(binding, address);

            Console.Write("Enter username: ");
            var username = Console.ReadLine();
            factory.Credentials.UserName.UserName = username;

            Console.Write("Enter password: ");
            var password = Console.ReadLine();
            factory.Credentials.UserName.Password = password;

            IWcfService host = factory.CreateChannel();

            Console.WriteLine("Please enter some words or press [Esc] to exit the application.");

            while (true)
            {
                var key = Console.ReadKey();
                if (key.Key.Equals(ConsoleKey.Escape))
                {
                    return;
                }

                string input = key.KeyChar.ToString() + Console.ReadLine(); // read input

                try
                {
                    string output = host.Echo(input); // send to host, receive output
                    Console.WriteLine("Service response: {0}", output); // write output
                }
                catch(CommunicationException ex)
                {
                    Console.WriteLine(ex.Message);
                }
            }
        }
    }
}
You should be able to compile the solution now once again. However, after starting and trying to connect to establish a connection, you will most likely run into the following exception:
"An error occurred while making the HTTP request to https://surface:9000/MyService. This could be due to the fact that the server certificate is not configured properly with HTTP.SYS in the HTTPS case. This could also be caused by a mismatch of the security binding between the client and the server."
To solve this problem, the self-signed certificate must be bound to the listener address (check this article for more information) of the machine that is hosting the web service. This can be done using the following command in an elevated command prompt. Replace the certhash with the certificate thumbprint that was already specified for the service implementation above. For the appid, you can use any GUID (use "Tools -> Create GUID" in Visual Studio for example).
netsh http add sslcert ipport=0.0.0.0:9000 certhash=babfcfb80454b4611f1888cf1f4ea6c37afde70e appid={633EFA95-D379-4C6F-AA86-F7170C7802EC}
Client and service should now be able to communicate with each other. I've copied the client to the remote host again and logged in to the service. Sending the "secret text" works without problems as shown below.
Of course, this is no prove at all that our demo application actually established a secure communication channel so let's check the network traffic again:
As you can see, the packets are no more recognized as HTTP requests/responses. Instead, the message content is completely encrypted so that neither the username/password nor the actual "secret text" that we've sent via the network can be read by the sniffer.
Great, isn't it? ;)
Related articles
- http://codebetter.com/petervanooijen/2010/04/09/a-simple-wcf-service-with-username-password-authentication-the-things-you-told-me/
- http://blog.mikejmcguire.com/2014/06/12/programatically-using-basichttpsbinding-and-usernamepasswordvalidator-classes-in-a-wcf-c-net-windows-service/
- http://www.codeproject.com/Articles/327259/What-s-new-in-WCF-BasicHttpsBinding
- http://msdn.microsoft.com/en-us/library/ms734679(v=vs.110).aspx
- http://msdn.microsoft.com/en-us/library/ms733791(v=vs.110).aspx
- http://www.jayway.com/2014/09/03/creating-self-signed-certificates-with-makecert-exe-for-development/


